
How to Install Windows 7 with only USB 3.0 Ports NUK 6i
Step by Step Walk-Through
1. Get the right USB 3.0 Drivers
For your installer to work with your computer, make sure you grab the proper USB 3.0 drivers.
In My Case it was a Intel NUK 6i:
https://downloadcenter.intel.com/download/26045/NUCs-Intel-Gigabit-Network-Connection-Driver-for-Intel-NUC-Kits-NUC6i-x-SY-and-NUC6i7KYK?product=89190
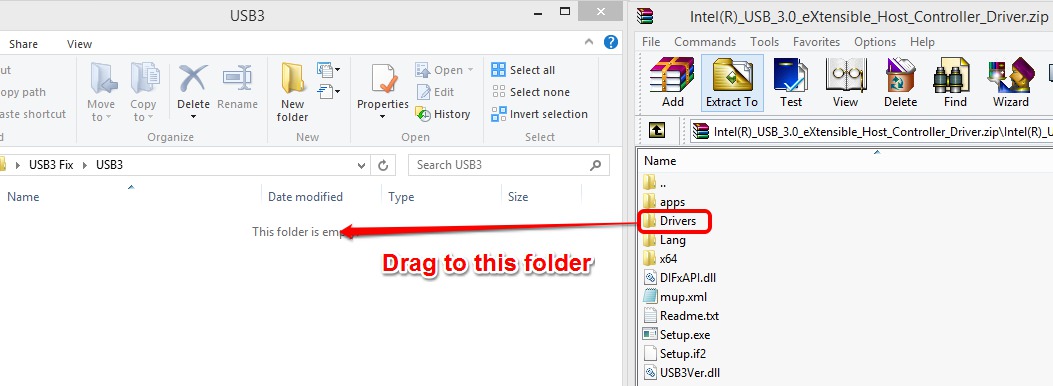
2. Extract the Drivers
Inside that folder create two separate folders: “USB3” and “mount”.

Now extract all the drivers into that USB3 folder.
3. Get the “boot.wim” and “install.wim” files
** Thanks for all the comments pointing out that you also need to update the install.wim file! **
Next, we need to get the files we need to install/add the drivers on. Open up your USB thumb drive that has your Windows 7 image on it and navigate to the Sources folder. Move the “boot.wim” file and “install.wim” into your “USB3 Fix” folder we created earlier.

4. Update the “boot.wim” and “install.wim” Files
Open up your cmd shell as an administrator. (Click Start on Windows 7, or Windows Key + Q on Windows 8, type in “cmd” and then right-click on the cmd application and choose Run as Administrator.)
Once open, navigate to the USB3_Fix folder in the cmd shell, and type in the following commands in this order to update the boot.wim file:
|
1
2
3
4
5
|
dism /mount–wim /wimfile:boot.wim /index:2 /mountdir:mount
dism /image:mount /add–driver:“usb3” /recurse
dism /unmount–wim /mountdir:mount /commit
|
It should look something like this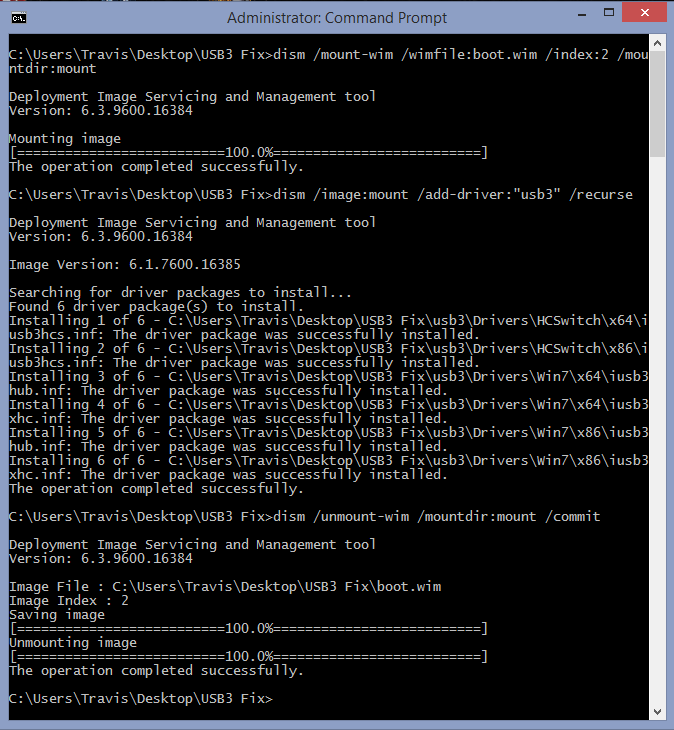
Next, do the same thing to the “install.wim” file. This file has a couple of different index values depending on what type of Windows you are installing. You can list all the indexes and their contents by typing in:
|
1
|
dism /Get–WimInfo /WimFile:install.wim
|
It will give you the output of the different installers and their indexes:

If you want to update all of them you will have to repeat the below process for the indexes you want to update. For me, I’m just installing Windows 7 Professional, so I’m only going to update that one.
|
1
2
3
4
5
|
dism /mount–wim /wimfile:install.wim /index:3 /mountdir:mount
dism /image:mount /add–driver:“usb3” /recurse
dism /unmount–wim /mountdir:mount /commit
|
If you are encountering dism errors when trying to run the above commands make sure that the wim files unmounted successfully by running the following command:
|
1
|
dism /cleanup–wim
|
After that command finishes, try mounting the wim that was giving you errors again and adding the drivers.
5. Replace the “boot.wim” and “install.wim” files
Now you’re done! Simply place the modified “boot.wim” and “install.wim” file back into the “sources” directory on your Win 7 iso bootable USB thumb drive and everything should work as expected!